Saturday, May 18, 2013

White Ranger Helmet: Part 8

The theme of this post is DAMAGE CONTROL.  If you should encounter any of these issues with cracks at this stage of your helmet, you can fix them as I have.  The most important point, however, is that all of these issues can potentially be avoided through proper cardboard skeleton construction, Celluclay application, and Dry-Dex application.  I saw a few of the cracks when preparing to spray primer, but 8 or 9 of them reared their ugly heads after the primer coat all over the helmet.  To say I was disappointed is putting it lightly, but I came up with a way that I hope will get rid of these cracks once and for all.  Bottom line, rule #1: don't let your helmet fall off your work space like I did, because this really sucks.

I figured the only way to get rid of these cracks is to literally cut them out down to the source.  I used my exacto knife to cut along both sides of every crack.  If your helmet is still slightly bendable even at this stage, go ahead and play with it a little bit because I assume the cracks will make themselves known down the road if you don't fix them now.  While I wish I would've fixed this at an earlier stage of construction, I know it will be much easier to fix this now than to do so later.


Now to make sure that I get rid of these cracks down to their source, I enlisted the help of a Dremel cutting tool.  I found this in the hardware section at Wal-Mart, it's the Dremel 7300 that comes with 5 accessories (one of which I used for the following step).  It's a handly tool for this project for under $25.  I also picked up a little pack of cutting wheel accessories (around $5) which I plan to use for reshaping the visor and mouth hole openings later.


\I used the grinding accessory from inside the box and I scoured each of the areas I cut out to make these cracks disappear once and for all.  Just a friendly reminder, read through the directions on this tool as you could be injured if it is used carelessly.  Even though it's small, it's still a spinning power tool with sharp accessories.


After I fully grinded each crack out sufficiently with the Dremel tool, I used little dabs of Dry-Dex to coat the rough patches where I had sanded back down to the Celluclay layer.  I am constantly reminded that I should have focused on perfecting the helmet shape earlier, but what can you do?  First time helmets are undoubtedly trial-and-error. 


After the Dry-Dex dried, I lightly sanded with the most soft grained sandpaper I had.  I was careful not to sand to hard.  The idea was to maintain the white color, if black started to appear I would have sanded too far and would have had to coat it again.  There are a couple of lumpy spots on the left-rear side of the helmet that I will have to coat one last time with Dry-Dex after I fill in the cracks. 

The reason I am doing parts of the Dry-Dex/sand step is because there are different levels of sanding necessary.  I didn't want to accidently sand too hard in one spot mistaking it for a crack-fill when it was actually a rough patch.  I really have made this more difficult than I needed to!  Here is how it looked with the cracks filled before and after sanding.

[Picture 1 and 2 to be uploaded]

After I reshaped the lumpy spots with the Dry-Dex and sanded, I made sure to blow all of the sanding dust off of it and sprayed one last coat of primer.  Once it dries, we will see if the damage control has worked.  The next post will involve reshaping the visor and mouth hole and any other cuts I need to make in reshaping the bottom of the helmet.  

Thursday, May 16, 2013

White Ranger Helmet: Part 7

After the Dry-Dex dried, I sanded it down as smooth as I could.  I recognized immediately (as will you) that I overlooked the importance of perfectly sanding the Celluclay coats.  Since I didn't sand it perfect, there are peaks and valleys coming up after sanding the dry wall compound.  You can see it as the gray patches in the white in the photos below that I took after about 45 minutes of sanding.


 I bought a can of primer at Wal-Mart for around 3 bucks.  You can get any color, I just think it would be wise to get a color that contrasts with the white Dry-Dex (or whatever product you decide to use).


I sprayed a single coat as evenly as possible around the entire helmetThis is how it looked after about 20 minutes of drying. 


I can already notice the imperfections clear as day from the sanding.  It's also very obvious where the Celluclay coat is peeking through the Dry-Dex.  I'm going to let it dry overnight to see if it is too unsightly.  If so, I will use some more of the Dry-Dex over those spots and sand lightly.  The cracks just under the visor hole are still giving me trouble so I'm already going to have to use some more tomorrow anyways.  And now we wait.

Tuesday, May 14, 2013

White Ranger Helmet: Part 6

It has been a while since I updated only because my work and life schedule has not allowed for much time to spent on the project.  Do not assume the dates on these posts reflect how long it would take you to make your own, as that would be far from reality and a bit discouraging.  The truth of the matter is that I've maybe put in a total of four to five hours of work spread over time since the part 5 post.

In the previous post you saw the first layer of celluclay mixture applied to the helmet.  Since then I sanded the helmet down, applied another coat of mixture (allowed to dry overnight), sanded again, applied another coat of mixture (allowed to dry overnight), sanded, and worked out some curvature details with a final coat of the celluclay (dried, and then sanded once more).  That works out to about 3-4 days of time it took because of how long it takes for the pulp to dry.

Sanding the celluclay after it dried has been an arduous task, be sure to have a sanding block nearby or else your hands and fingers will be very worn out and it will take longer.  Of course, you could always use an electric sander but I imagine this would be too rough on the malleable cardboard structure below and cause cracks to fix time and time again.  

Some definite issues I ran into (and hopefully you can avoid) were the realization that the helmet isn't properly shaped along the jaws similar to the show prop.  Half of this was because of the shape of my head, the other half was because I didn't have reference material on-hand at all times (and 100% because I'm a complete beginner at this and have no clue what I'm doing).  Keep reference material nearby, it has become a big hassle and a time-waster for me to have to fix things when I could have fixed it much quicker in the cardboard stage.

One other unfortunate event was when I broke part of the front of the helmet.  Lesson learned: Have a proper stand for your helmet.  The two foam pieces I used as a wannabe mannequin couldn't support the weight/center of gravity of the helmet and it fell over a time or two causing the break and a couple of cracks which have been very time consuming to fix.  After the full break, I cut out the cardboard behind it because it was warped and likely wouldn't hold any sculpting shape properly.

After I was satisfied with the general shape of the helmet (something I had to accept because there's no way it can be perfect at this stage and I'd rather not start over), I applied a coat of Dap Dry-Dex which is essentially dry wall spackling.  It goes on pink and dries white a lot quicker than the celluclay.  


This was much easier to sand too but be sure you are in a well ventilated area and don't mind a mess because there will be white dust EVERYWHERE even after a few minutes.  I didn't apply a coat to the entire helmet because it was more or less a test run and I was actually satisfied with the results.  Here is how it looked after maybe 15-20 minutes of sanding.


The next steps will be: 

1) finishing the dry-dex coat, 
2) sanding out to reveal imperfections in shape, 
3) fixing those imperfections with as little dry-dex as possible,
4) sanding once more until it is perfectly smooth,
5) applying primer
6) and sanding again (are you seeing a pattern here?)

Everything coming next appears to be a little bit easier, and I will not lie, the celluclay sanding really got the best of me at times and probably had more than just a little to do with why the progress essentially halted.  Expect the next post to come sometime this weekend.

Saturday, March 30, 2013

White Ranger Helmet: Part 5

After applying a total of three paper mache layers to the helmet and allowed it all to fully dry, I went to the store and bought some Celluclay (a paper mache mix needing only water, 1 lb box was about six dollars) instead of making my own paper mache pulp.  I looked for a mannequin but couldn't find one, so I just bought a styrofoam cone and ball and glued them together to keep the helmet up.  I had a mixing bowl and some tools to apply the mix.  Here's a picture if you're wondering what the Celluclay stuff looks like:
 

I recommend a bigger bowl, but this was all I had and I didn't feel like going back out to the store so I just mixed little by little and applied globs and smoothed them out.  I ended up abandoning the tools and just used my hands in some rubber gloves.  I had to even out all of the places that were sloping unnaturally, and as a result the helmet gained some significant weight.  I ended up using about half of the bag of Celluclay mix and this is what I ended up with:


With it being all uneven it seemed like a sanding nightmare after it dried, so I just dipped my hand in a bowl of water and smoothed it out as best as I could to facilitate with sanding after it dries.  At this point I'm going to let it dry overnight because I had to use a lot more of the stuff than I would have needed if I had just assembled the skeleton cardboard layers with a little more care.  With all of that aside, it's starting to look pretty damn cool if you ask me!


Tuesday, March 26, 2013

White Ranger Helmet: Part 4

I added a second layer of paper mache.  One thing I have run into is material warping.  It may be that I'm using too much of the glue mixture, but I'm sure that if I had some sort of way to keep the inside braced (a mannequin head with my dimensions for instance) I could avoid this issue.  For now, I'm just keeping an eye on the helmet as it's drying and occasionally putting some pressure with my hands on the parts that need to keep their shape.  What is giving me the most trouble with movement is the line where the visor hole meets the mouthpiece hole.  

I figured that some of the warping was being caused by gravity.  I have the helmet standing on its own (no stand, mannequin, etc.) so the weight of the helmet is likely causing the material to bend while it is drying.  Since I don't have a mannequin head or anything else for now, I just propped it up on a can of lysol spray (the tallest can I had) to prevent any pressure points for the next layers.  When you are working on yours, keep warping in mind and try to have something in place to keep it from doing so.

Sunday, March 24, 2013

White Ranger Helmet: Part 3

Today I started with the first layer of paper mache.  I hadn't done this sort of thing since I was in high school so I needed some brushing up.  The most common recommendation I found was Elmer's Wood Glue mixed with a bit of water.  I bought a newspaper and started cutting strips and dipping them in the mixture and spread them across all the outer surfaces of the helmet.  I used smaller pieces around the visor and mouthpiece to slightly wrap inside the helmet to secure the pieces.  


I'm going to let the first layer dry, I have no idea how long it will take, I went a little crazy with the glue so it could take a while.  The plan is to do a few more layers of paper mache through the week and then make some paper mache pulp to even out all the mistakes I've made at the top curve of the helmet.  And now, we wait...

Saturday, March 23, 2013

White Ranger Helmet: Part 2

When I made the basic shape of the helmet I did it knowing I would have to make adjustments as I got closer to finishing the skeleton.  The idea was to make sure it could fit on my head with continual try-ons and it's good to be working with cardboard because all you need is a pair of scissors to add on or take off.

The next step was to fill in all the gaps with cardboard (as suggested by the link in the previous post).  For the top of the helmet I just generalized the size of cardboard I would need and hot glue gunned one side to secure the piece and made adjustment cuts as I tried to size it to the skeleton.  


In retrospect, I realize it would've been much easier to trace the outline with a piece of paper and then cut the cardboard along the outline.  In the future, I will do it that way to save time and create a more natural curve at the top of the helmet.  I assume (rather, hope) that I'll be able to fix it once I start adding the layers of paper mache and pulp.  

Once I finished the top, I added more cardboard at a slight curve to cover the front of my chin and filled in the gaps at the front of the helmet.  I used masking tape like before to temporarily secure the pieces and then went over the edges with the hot glue gun to keep it in place.  I left a general opening where the visor will be.  


I did a little cutting along the bottom because it was starting to look more like a Clone Trooper helmet in shape.  It was a slightly angled cut to the back of the helmet.  I just used some masking tape to hold that in place.  For the fit I imagined how a motorcycle helmet would be shaped along the bottom and tried to cut it like that.  It was a very slight angle, but if you cut off too much you can always add more cardboard and reshape.  Trying it on several times after adjustments was necessary, and I learned it was even more important during the next step.
 
The next step involved using a marker to draw a general outline of where the visor was going to be and also the mouthpiece or whatever you want to call it.  I would have used an exacto knife but I didn't have one on hand so I just found the sharpest knife I could and carved out the mouth area.  Since there was already an area open for the visor, I just used some scissors to cut out the rest of the visor hole.  I made adjustments as I did it and compared it to reference pictures (screenshots from the show) and this is what I came up with:


Not perfect, but it looks good enough to me!  After trying it on once more I realized that I needed to make the helmet a little bit longer in the front only for fitting my face without having a full view of my head if someone were standing below me (something I rarely avoid since I'm tall), so I just shaped out some more cardboard and added a little bit to curve under the bottom of my chin.  I'm not sure if that will take away from the realism of the helmet, but I figure I can make the mouthpiece area a bit longer if it looks too odd.

One problem I have run into so far (which may or may not be a problem) involved adding the cardboard at the top curve of the helmet.  If I had used paper to make the cuts perfect from the beginning, then the helmet wouldn't be slightly lopsided.  The center of the visor from the front view had to be moved slightly to the left due to this, but it looks fine once the helmet is on.  Lesson learned.


It looks good at this stage and I'm very pleased with how it's turned out so far considering this is my first attempt at anything like this.  I have a day off work tomorrow so I plan on starting the first couple layers of paper mache.  The next post will cover how that goes.

Friday, March 22, 2013

White Ranger Helmet: Part 1

My first costume is going to be of the White Ranger from "Mighty Morphin Power Rangers", a show that I grew up watching obsessively.  Since you're here, you likely know what the White Ranger looks like, but for those who don't:


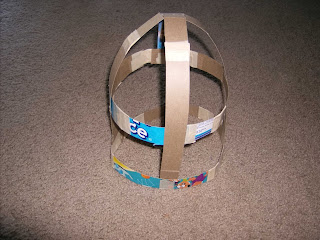
Upon doing research, I discovered a tutorial by someone who had built their own (Link: http://www.instructables.com/id/Power-Rangers-Helmet/).  Spending some time on it last night I decided I couldn't get it just like that tutorial, so I've decided to take it in a fairly different direction.  So far, I have made the most basic skeleton of the helmet.  The most time consuming aspect of it has been continually resizing it to fit my egg head.  In order to allow for constant fitting, I've decided to leave the bottom loose for now until I can figure out how to reshape it later.  

The positive side of this is that I'm working with cardboard (from a cereal box) and masking tape prior to using a hot glue gun to stick the pieces together for good.  Here is the first photo of my mistake:

 I thought it would be a good idea try and get it below my jaw, but of course that didn't allow me to try it on very easily (beginners mistake).  If it's hard to put on now, it'll be hard to put on once it's got whatever compounds I decide to use to make it a hard helmet.  I cut that vertical jaw loop and thought it would be easier to make an open loop similar to the forehead loop.  


This allowed for the bottom horizontal loop to go around my chin so I could try it on as I finished the skeleton.  My plan is to make adjustments later to make it shaped more like the show-used helmet


Below are pictures after I added the new loop for ease of access.  The second picture is a rear view.  This is going to take a lot of tweaking as the process moves forward, and certainly a lot of time because I'm a novice at this.  My hope is that by sharing my mistakes, it might help save you time when you decide to craft your own.


Introduction

My name is Pete and I created this blog to keep track of the progress of my first attempt at a hand-made Power Ranger costume.  I was inspired by all of the Lexington Comic Con 2013 attendees who had their own, and upon online research I discovered that this was quite an expensive hobby (if you paid someone else to make it for you).  As such, I decided to give it a go and allow others to see how it's done so that others may be able to replicate the process for their own enjoyment.

As I said, I am 100% new at this and there are going to be bumps and rough spots along the way, but that's how all of life's lessons are learned: trial and error.  I hope that you enjoy the pictures and tutorials and are in some way able to apply them to your own Power Ranger costume in the future.  Good luck to you, and especially to me because I'm gonna need it!